Incubating an ostrich egg can be a fascinating and rewarding experience. Ostriches are the largest birds in the world, and their eggs are equally impressive in size. Incubation is the process of providing the necessary conditions for an egg to develop and hatch into a healthy chick. It requires careful attention to temperature, humidity, and turning the egg regularly. In this article, we will guide you through the steps involved in incubating an ostrich egg, from acquiring the egg to successfully hatching a chick. So, if you’re ready to embark on this unique journey, let’s dive in!
Key Takeaways
- Incubating an ostrich egg requires careful temperature and humidity control.
- The ideal temperature for incubating an ostrich egg is around 97-99 degrees Fahrenheit.
- Humidity levels should be maintained at around 40-50% during the incubation process.
- Regularly turning the egg is crucial to ensure proper development of the embryo.
- Incubation period for ostrich eggs is approximately 42-46 days.
- Consulting with experts or experienced breeders can provide valuable guidance during the incubation process.
Understanding Ostrich Eggs: A Brief Overview
A. The Unique Nature of Ostrich Eggs
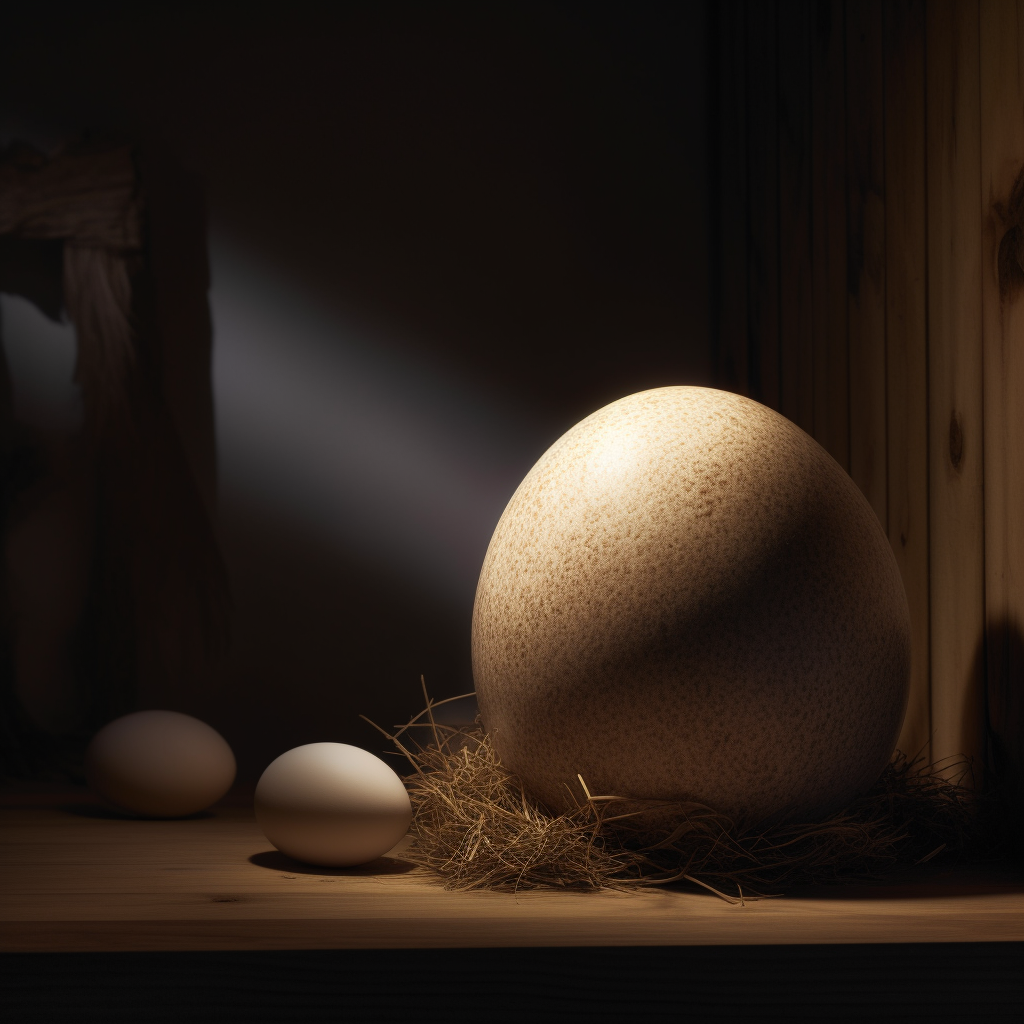
Ostrich eggs are truly remarkable. They are the largest eggs laid by any living bird species, weighing around 1.4 kilograms (3 pounds) on average. These eggs are about 15 times larger than chicken eggs, making them a fascinating subject of study and a prized possession for collectors and breeders alike.
One of the most distinctive features of ostrich eggs is their thick and sturdy shell. The shell is composed of calcium carbonate, which provides excellent protection for the developing embryo inside. It is so strong that it can withstand the weight of an adult human without breaking. This durability is essential as ostriches lay their eggs on the ground, where they are at risk of being trampled upon.
Another interesting characteristic of ostrich eggs is their unique shape. Unlike chicken eggs, which are oval, ostrich eggs are elongated and have a more cylindrical shape. This shape allows the eggs to be easily stacked and stored, making them convenient for transportation and incubation.
B. Why Incubate Ostrich Eggs?
Incubating ostrich eggs is a crucial step in the process of hatching them. By artificially incubating the eggs, we can provide the optimal conditions for the embryos to develop and increase the chances of successful hatching. There are several reasons why people choose to incubate ostrich eggs:
-
Controlled Environment: Incubating ostrich eggs allows us to create a controlled environment with the ideal temperature, humidity, and ventilation. This ensures that the embryos receive the necessary conditions for healthy development.
-
Increased Hatchability: Ostrich eggs have a relatively low hatchability rate when left to natural incubation. By using artificial incubation methods, we can significantly increase the chances of successful hatching and maximize the number of healthy chicks.
-
Efficient Use of Resources: Incubating ostrich eggs allows breeders to optimize their resources. By carefully monitoring the incubation process, they can identify and remove infertile or damaged eggs, freeing up space and resources for the healthy ones.
-
Conservation Efforts: Incubating ostrich eggs plays a vital role in conservation efforts. Ostrich populations have been declining in the wild due to habitat loss and poaching. By incubating eggs and successfully hatching chicks, we can contribute to the preservation of this magnificent species.
In the next sections, we will delve into the details of how to incubate ostrich eggs, including the necessary equipment, incubation period, and temperature and humidity requirements. So, let’s get started on this exciting journey of ostrich egg incubation!
The Incubation Process: A Detailed Guide
A. Preparing for Incubation: What You Need
Before you embark on the exciting journey of incubating an ostrich egg, it’s important to gather all the necessary supplies to ensure a successful incubation process. Here’s a list of items you’ll need:
-
Incubator: Invest in a reliable and spacious incubator that can accommodate the large size of an ostrich egg. Look for an incubator specifically designed for avian eggs, as it will provide the necessary temperature and humidity control.
-
Thermometer and Hygrometer: Accurate temperature and humidity monitoring are crucial for the development of the ostrich embryo. Make sure to have a reliable thermometer and hygrometer to keep track of these parameters.
-
Egg Turning Device: Ostrich eggs need to be turned regularly during incubation to prevent the embryo from sticking to the shell. An automatic egg turner can simplify this process and ensure consistent turning.
-
Candle or Light Source: Candling is a method used to examine the development of the embryo inside the egg. A candle or a bright light source will help you observe the changes and identify any potential issues.
-
Clean and Sterile Environment: Create a clean and sterile area for incubation. This includes a dedicated space for the incubator, as well as proper cleaning and disinfection of all equipment and surfaces involved in the process.
B. Steps to Incubate an Ostrich Egg
Now that you have all the necessary supplies, let’s dive into the step-by-step process of incubating an ostrich egg:
-
Collect the Egg: If you’re an ostrich breeder, you’ll have your own ostriches to collect eggs from. However, if you’re sourcing the egg from elsewhere, make sure to obtain it from a reputable breeder. Choose an egg that is clean, undamaged, and fertile.
-
Clean the Egg: Before placing the egg in the incubator, it’s essential to clean its surface. Use a mild disinfectant solution and a soft cloth to gently wipe away any dirt or debris. Avoid using harsh chemicals that could harm the embryo.
-
Set Up the Incubator: Position the egg in the incubator with the pointed end facing down. This is the natural position in which an ostrich egg would be laid in a nest. Ensure that the incubator is set to the correct temperature and humidity levels recommended for ostrich eggs.
-
Monitor Temperature and Humidity: Regularly check the temperature and humidity inside the incubator using the thermometer and hygrometer. Maintain a temperature of around 97-99 degrees Fahrenheit (36-37 degrees Celsius) and a humidity level of 40-50% for the first 35 days. During the last few days of incubation, increase the humidity to 60-70%.
-
Turn the Egg: Ostrich eggs need to be turned at least three times a day to prevent the embryo from sticking to the shell. If you’re using an automatic egg turner, ensure that it is functioning properly. If not, manually turn the egg by gently rolling it from one side to the other.
-
Candle the Egg: After approximately 10 days of incubation, you can start candling the egg to monitor the embryo’s development. Hold the egg against a bright light source and observe the internal changes. Look for signs of blood vessels, air sac formation, and movement within the egg.
-
Maintain a Clean Environment: Regularly clean and disinfect the incubator and all equipment to prevent the growth of bacteria or fungi. A clean environment is crucial for the health and development of the ostrich embryo.
C. Monitoring the Incubation Process
Throughout the incubation period, it’s important to closely monitor the progress of the ostrich egg. Here are some key points to keep in mind:
-
Record Observations: Maintain a record of your observations during the incubation process. Note down the candling results, any changes in temperature or humidity, and any other relevant observations. This will help you track the progress and identify any issues that may arise.
-
Addressing Problems: If you notice any abnormalities during candling or if the embryo stops developing, it’s important to take action. Consult with an experienced ostrich breeder or avian veterinarian to determine the best course of action. They can provide guidance on troubleshooting common issues and offer advice on how to proceed.
-
Prepare for Hatching: As the incubation period nears its end, prepare a separate hatcher within the incubator. This hatcher should have higher humidity levels to facilitate the hatching process. Transfer the egg to the hatcher a few days before the expected hatch date.
-
Patience is Key: Incubating an ostrich egg requires patience and careful monitoring. The incubation period for ostrich eggs is approximately 42-46 days. During this time, avoid unnecessary disturbances and maintain a stable environment for the developing embryo.
By following these steps and providing the necessary care and attention, you can increase the chances of successfully incubating an ostrich egg. Remember, each egg is unique, and the process may vary slightly depending on individual circumstances.
The Role of Temperature and Humidity in Ostrich Egg Incubation
When it comes to incubating ostrich eggs, two crucial factors play a significant role in ensuring successful hatching: temperature and humidity. These factors must be carefully controlled and monitored throughout the incubation period to create an optimal environment for the developing embryos. In this section, we will explore the ideal temperature for ostrich egg incubation, the importance of humidity, and how to adjust and maintain the appropriate levels.
A. Ideal Temperature for Ostrich Egg Incubation
Maintaining the correct temperature is vital for the successful incubation of ostrich eggs. The ideal temperature range for ostrich egg incubation is between 97 and 99 degrees Fahrenheit (36 to 37 degrees Celsius). This temperature range closely mimics the conditions that would naturally occur when the eggs are incubated by the female ostrich.
To achieve and maintain the desired temperature, an incubator specifically designed for large eggs, such as ostrich eggs, is necessary. These incubators are equipped with temperature control mechanisms that allow for precise adjustments. It is important to note that fluctuations in temperature can negatively impact the development of the embryos, so it is crucial to maintain a stable temperature throughout the incubation period.
B. Importance of Humidity in Ostrich Egg Incubation
Humidity is another critical factor in ostrich egg incubation. The level of humidity within the incubator directly affects the moisture content of the eggs, which is essential for proper development. The ideal humidity range for ostrich egg incubation is between 25% and 40%.
Maintaining the correct humidity level is crucial for preventing the eggs from drying out or becoming too moist. If the humidity is too low, the eggs may lose moisture, leading to dehydration and potential embryo death. On the other hand, if the humidity is too high, the eggs may become overly moist, increasing the risk of bacterial growth and negatively impacting embryo development.
C. Adjusting Temperature and Humidity Levels
To ensure optimal incubation conditions, it is necessary to monitor and adjust both temperature and humidity levels regularly. Here are some guidelines to help you maintain the ideal environment for ostrich egg incubation:
-
Temperature Control: Use a reliable incubator with accurate temperature control capabilities. Set the temperature within the recommended range of 97 to 99 degrees Fahrenheit (36 to 37 degrees Celsius) and monitor it closely. Avoid sudden temperature fluctuations, as they can be detrimental to embryo development.
-
Humidity Control: Maintain the humidity level within the recommended range of 25% to 40%. This can be achieved by using a hygrometer to measure humidity and adjusting it accordingly. If the humidity is too low, you can increase it by adding water to the incubator or using a humidifier. If the humidity is too high, you can decrease it by increasing ventilation or using a dehumidifier.
-
Regular Monitoring: Regularly check the temperature and humidity levels in the incubator to ensure they remain within the desired range. Make adjustments as necessary to maintain a stable environment for the developing embryos.
-
Record Keeping: Keep a record of temperature and humidity readings to track the progress of incubation. This will help you identify any deviations from the optimal conditions and take corrective measures if needed.
By carefully controlling and adjusting the temperature and humidity levels, you can create an ideal environment for ostrich egg incubation. Remember to monitor these factors regularly and make necessary adjustments to ensure the best possible conditions for the development and hatching of the ostrich chicks.
The Incubation Period: What to Expect

When it comes to incubating an ostrich egg, understanding the incubation period is crucial. This period refers to the time it takes for the egg to develop and eventually hatch into a healthy ostrich chick. In this section, we will explore the various aspects of the incubation period, including its duration, signs of successful incubation, and what to expect during this fascinating process.
A. Understanding the Incubation Period of an Ostrich Egg
The incubation period of an ostrich egg is a remarkable journey of growth and development. Ostrich eggs are known for their large size and unique characteristics. They require specific conditions to ensure successful incubation.
During the incubation period, the ostrich egg undergoes a series of changes. The embryo inside the egg develops and grows, gradually forming the body of the future ostrich chick. This process is influenced by factors such as temperature, humidity, and turning of the egg.
B. Signs of Successful Incubation
As an ostrich egg incubator, it is essential to be able to identify signs of successful incubation. These signs indicate that the embryo is developing as expected and that the egg is on its way to hatching.
One of the first signs of successful incubation is the appearance of veins when candling the egg. Candling involves shining a light through the egg to observe the embryo’s growth. The presence of visible veins indicates that the embryo is developing and receiving the necessary nutrients.
Another sign of successful incubation is the formation of an air pocket within the egg. As the embryo grows, it consumes oxygen and produces carbon dioxide. This exchange of gases creates an air pocket at the top of the egg, which can be observed when candling.
C. How Long Does it Take to Hatch an Ostrich Egg?
The incubation period of an ostrich egg typically lasts around 42 to 46 days. However, it is important to note that this duration can vary slightly depending on various factors such as temperature and humidity.
To ensure a successful hatch, it is crucial to maintain the appropriate temperature and humidity levels throughout the incubation period. The ideal temperature for incubating ostrich eggs is around 97 to 99 degrees Fahrenheit (36 to 37 degrees Celsius). Humidity levels should be kept at approximately 25 to 40 percent during the first 35 days, and then increased to 60 to 70 percent during the final days of incubation.
During the incubation period, it is recommended to turn the eggs at least three times a day. This helps prevent the embryo from sticking to the inner membrane and promotes even development. However, it is important to stop turning the eggs around day 35 to allow the chicks to position themselves for hatching.
In conclusion, understanding the incubation period of an ostrich egg is essential for successful hatching. By monitoring the signs of successful incubation and maintaining the appropriate temperature, humidity, and turning schedule, you can increase the chances of a healthy ostrich chick emerging from its shell. So, get ready for an exciting journey as you embark on the incredible process of incubating an ostrich egg!
Troubleshooting Common Incubation Issues
A. Identifying and Resolving Incubation Problems
Incubating ostrich eggs can be a rewarding experience, but it’s not without its challenges. Sometimes, issues may arise during the incubation process that can affect the health and development of the growing embryo. It’s important to be able to identify and resolve these problems to increase the chances of a successful hatch. Here are some common incubation issues and how to address them:
-
Temperature Fluctuations: Maintaining a consistent temperature is crucial for the proper development of ostrich eggs. If the temperature in the incubator fluctuates too much, it can negatively impact the embryo. To address this issue, make sure to regularly monitor the temperature and adjust the settings on your incubator if necessary. If the temperature is consistently too high or too low, consider calibrating or replacing your incubator thermometer.
-
Humidity Imbalance: Ostrich eggs require a specific level of humidity during incubation. If the humidity is too high or too low, it can lead to problems such as excessive moisture loss or bacterial growth. To address this issue, use a hygrometer to monitor the humidity levels in the incubator. If the humidity is too low, you can increase it by adding water to the incubator or using a wet sponge. If the humidity is too high, you can decrease it by increasing ventilation or using a dehumidifier.
-
Poor Egg Positioning: The position of the ostrich egg during incubation is crucial for proper development. If the egg is not positioned correctly, it can lead to deformities or even death of the embryo. To address this issue, make sure to place the eggs with the pointed end facing downwards. This allows the air cell to be in the uppermost part of the egg, which is essential for the embryo’s respiration. Additionally, avoid moving or rotating the eggs excessively during incubation.
-
Candling Difficulties: Candling is a process where a light source is used to examine the development of the embryo inside the egg. However, sometimes it can be challenging to see through the thick shell of an ostrich egg. To address this issue, try using a more powerful light source or holding the egg against a dark background. You can also try candling the eggs in a dark room to enhance visibility.
B. Ensuring the Health of the Hatching Ostrich
Once the incubation period is nearing its end, it’s important to take additional steps to ensure the health and well-being of the hatching ostrich. Here are some tips to consider:
-
Prepare a Clean Hatching Area: Before the eggs start to hatch, it’s essential to prepare a clean and safe hatching area. Remove any debris or soiled bedding from the hatching pen and sanitize the area to minimize the risk of infection. Providing a clean environment will help reduce the chances of the chicks encountering harmful bacteria.
-
Collect Hatched Chicks Promptly: When the eggs start to hatch, it’s crucial to collect the hatched chicks promptly. Leaving them in the hatching pen for too long can increase the risk of injury or cannibalism by other chicks. As soon as a chick has hatched, gently transfer it to a brooder or a separate area where it can receive the necessary care and attention.
-
Monitor the Hatching Process: Keep a close eye on the hatching process and intervene if necessary. Sometimes, chicks may struggle to hatch due to a variety of reasons, such as a weak shell or improper positioning. If you notice a chick having difficulty hatching, you can carefully assist by gently peeling away bits of the shell, being careful not to damage the membrane or the chick.
-
Provide Proper Care for the Hatchlings: Once the chicks have hatched, it’s important to provide them with the proper care and nutrition. Make sure to provide a clean and warm brooder with appropriate bedding, heat source, and fresh water. Feed the chicks a balanced diet specifically formulated for ostrich chicks to ensure their healthy growth and development.
By being aware of common incubation issues and taking proactive measures to address them, you can increase the chances of a successful hatch and ensure the health and well-being of the hatching ostriches. Remember to closely monitor the incubation conditions, provide a clean hatching area, and offer proper care for the hatchlings. With patience and attention to detail, you can enjoy the rewarding experience of incubating ostrich eggs and witnessing the miracle of life.
Post-Incubation Care: Ensuring Ostrich Chick Survival

Congratulations on successfully incubating an ostrich egg! Now that the egg has hatched, it’s time to shift your focus to caring for the newly hatched ostrich chick and ensuring its survival. This crucial stage requires attention to detail and proper care to give the chick the best chance at a healthy life. Let’s explore the key aspects of caring for a newly hatched ostrich chick and feeding and raising it to be a strong and healthy bird.
A. Caring for a Newly Hatched Ostrich Chick
Caring for a newly hatched ostrich chick requires creating a suitable environment that mimics the conditions it would experience in the wild. Here are some essential considerations to keep in mind:
-
Temperature Control: Ostrich chicks need a warm and comfortable environment to thrive. Maintain a temperature of around 95 to 100 degrees Fahrenheit (35 to 38 degrees Celsius) in the brooding area for the first few weeks. Use a heat lamp or a brooder to provide a consistent source of warmth. Ensure that the temperature is evenly distributed throughout the brooding area.
-
Bedding: Provide a soft and clean bedding material for the ostrich chick. Wood shavings or straw can be used as bedding. Regularly clean the bedding to maintain hygiene and prevent the build-up of bacteria or parasites.
-
Water and Feed: Ostrich chicks need access to clean and fresh water at all times. Use shallow containers or waterers that are easily accessible for the chicks. Additionally, provide a balanced diet specifically formulated for ostrich chicks. This diet should consist of high-quality commercial chick starter feed, which contains the necessary nutrients for their growth and development.
-
Lighting: Provide a source of light in the brooding area to ensure the chicks have a consistent day-night cycle. Use a light source that emits a warm, natural light to mimic sunlight. A 12 to 14-hour light-dark cycle is recommended for the chicks’ well-being.
-
Protection from Predators: Ensure that the brooding area is secure and protected from potential predators. Ostrich chicks are vulnerable to various predators, including snakes, rodents, and birds of prey. Install appropriate fencing and take necessary precautions to keep the chicks safe.
B. Feeding and Raising a Healthy Ostrich
Feeding and raising a healthy ostrich involves providing the right nutrition and implementing proper management practices. Here are some key points to consider:
-
Feeding Schedule: Ostrich chicks should be fed multiple times a day to support their rapid growth. Initially, feed them small amounts of starter feed every few hours. Gradually increase the amount of feed as they grow. Monitor their appetite and adjust the feeding schedule accordingly.
-
Supplementation: Ostrich chicks may require additional supplementation to ensure they receive all the necessary nutrients. Consult with a veterinarian or an experienced ostrich breeder to determine if any supplements, such as vitamins or minerals, are needed for optimal growth.
-
Grazing and Foraging: As the ostrich chicks grow older, introduce them to grazing and foraging. Provide access to a safe and spacious outdoor area where they can explore and find natural food sources. This helps develop their natural instincts and encourages healthy growth.
-
Health Monitoring: Regularly monitor the health of the ostrich chicks. Look for signs of illness or distress, such as decreased appetite, lethargy, or abnormal behavior. If you notice any concerning symptoms, seek veterinary assistance promptly.
-
Socialization: Ostriches are social animals, and it is beneficial for the chicks to interact with others of their kind. If possible, introduce the chicks to other ostriches of similar age. This helps them develop social skills and reduces stress.
Remember, raising ostrich chicks requires patience, dedication, and attention to detail. By providing a suitable environment, proper nutrition, and regular care, you can ensure the healthy development and survival of your ostrich chicks.
In the next section, we will explore the fascinating world of ostrich farming and the benefits it offers. Stay tuned!
Conclusion
In conclusion, incubating an ostrich egg is a fascinating process that requires careful attention to temperature, humidity, and turning. By following the steps outlined in this article, you can increase the chances of successfully hatching an ostrich chick. Remember to gather all the necessary equipment, create a suitable incubation environment, and monitor the egg regularly. It’s important to note that incubating ostrich eggs can be challenging, and it may take some trial and error to achieve the desired results. However, with patience and perseverance, you can experience the joy of witnessing an ostrich chick hatch and grow. So, if you’re up for the challenge, give ostrich egg incubation a try and embark on a unique and rewarding journey in the world of aviculture.
Frequently Asked Questions
How do you incubate an ostrich egg in Stardew Valley?
In Stardew Valley, you can incubate an ostrich egg by placing it in the Big Coop‘s or Deluxe Barn’s incubator. It takes 12 days for the ostrich egg to hatch.
How long does it take to incubate an ostrich egg?
The incubation period of an ostrich egg is typically around 42 days. However, it can vary slightly depending on the specific conditions of the incubation, including temperature and humidity.
How do you hatch an ostrich egg in Stardew Valley?
To hatch an ostrich egg in Stardew Valley, you need to place it in the incubator in a Big Coop or Deluxe Barn. After 12 days, the ostrich egg will hatch, provided that there is space in the barn or coop.
What is the incubation period of an ostrich egg?
The incubation period of an ostrich egg is approximately 42 days. This period can vary slightly depending on the conditions of the incubation.
Where can you incubate an ostrich egg in Stardew Valley?
In Stardew Valley, you can incubate an ostrich egg in the Big Coop or Deluxe Barn. These buildings come equipped with an incubator specifically designed for this purpose.
Can you incubate an ostrich egg in Stardew Valley?
Yes, you can incubate an ostrich egg in Stardew Valley. You need to place the egg in the incubator in a Big Coop or Deluxe Barn and wait for 12 days.
What is the ideal ostrich egg incubation temperature?
The ideal temperature for incubating an ostrich egg is between 36.5 and 37.5 degrees Celsius. Maintaining a consistent temperature is crucial for successful incubation.
How can you ensure successful ostrich egg incubation?
Successful ostrich egg incubation requires maintaining a consistent temperature between 36.5 and 37.5 degrees Celsius, controlling humidity around 25-40%, and turning the eggs at least once a day. Using a reliable incubator can help maintain these conditions.
What are the common problems encountered during ostrich egg incubation?
Common problems during ostrich egg incubation can include fluctuating temperatures, incorrect humidity levels, and not turning the eggs regularly. These issues can affect the development and hatching success of the ostrich eggs.
How can you check the fertility of an ostrich egg during incubation?
You can check the fertility of an ostrich egg during incubation through a process called candling. This involves shining a bright light through the egg to observe the development of the embryo. If the egg is fertile, you will see veins and an embryo developing; if it’s infertile, it will remain clear.